

There’s nothing quite like biting into a chewy, flavorful sourdough bagel with that satisfying crunch of a perfectly baked crust. But did you know making these at home is easier than you think? In this guide, we’ll reveal the top 5 secrets behind crafting the ideal sourdough bagels recipe. Whether you’re a seasoned baker or just starting out, these expert tips will help you achieve bakery-quality results right in your kitchen!
Table of Contents
Mastering the Dough Fermentation Process
Why Sourdough Starter Matters
You know what they say—great bagels start with great dough, and great dough starts with a killer sourdough starter. I’ve been baking for years, but let me tell you, my first few attempts at using a sourdough starter were… well, let’s just say, disastrous . The key is having an active starter that’s bubbly and smells slightly tangy—not like old socks or forgotten fruit juice! An active starter gives your bagels their signature tangy flavor and chewy texture. Without it, you’re basically making plain bread rings, which ain’t gonna cut it in the world of sourdough bagels.
Here’s how to keep your starter happy:
- Feed Regularly: Treat your starter like a tiny pet—it needs love, warmth, and food (flour and water). Neglect it, and it’ll go dormant faster than a teenager during algebra class.
- Use the Right Ratio: Stick to a 1:1:1 ratio of starter:flour:water by weight. It keeps everything balanced and bubbling.
- Control Temperature: Keep your starter between 70°F–75°F for optimal activity. Too cold? It slows down. Too hot? You might kill those precious microbes.
How Long Should You Ferment the Dough?
Now, onto fermentation time—the part where magic happens. This step can make or break your bagels. For sourdough bagels, aim for about 12–18 hours of bulk fermentation. Yes, it takes patience, but trust me, the wait pays off big time. During this phase, the wild yeast and bacteria in your starter work overtime to develop complex flavors and improve texture.
But here’s the thing—fermentation isn’t one-size-fits-all. Factors like room temperature and humidity play huge roles. On warmer days, your dough might ferment quicker, so keep an eye on it. Look for these signs:
- Increased volume
- Visible bubbles
- A slight rise in the dough
One time, I left my dough fermenting overnight during summer, and when I woke up, it had tripled in size—and tasted amazing! If you’re new to this, don’t stress if things don’t turn out perfect the first time. Even pros mess up sometimes. Just adjust based on experience, and soon enough, you’ll have perfectly fermented dough ready for shaping.
Crafting the Perfect Bagel Shape
Step-by-Step Shaping Techniques
Shaping sourdough bagels might sound intimidating, but honestly? It’s easier than you think. When I first started making bagels, I was so worried about getting them perfectly round that I spent way too much time stressing over every little detail. Spoiler alert: they still tasted great even if they weren’t perfect circles! But hey, who doesn’t want their creations to look as good as they taste, right?
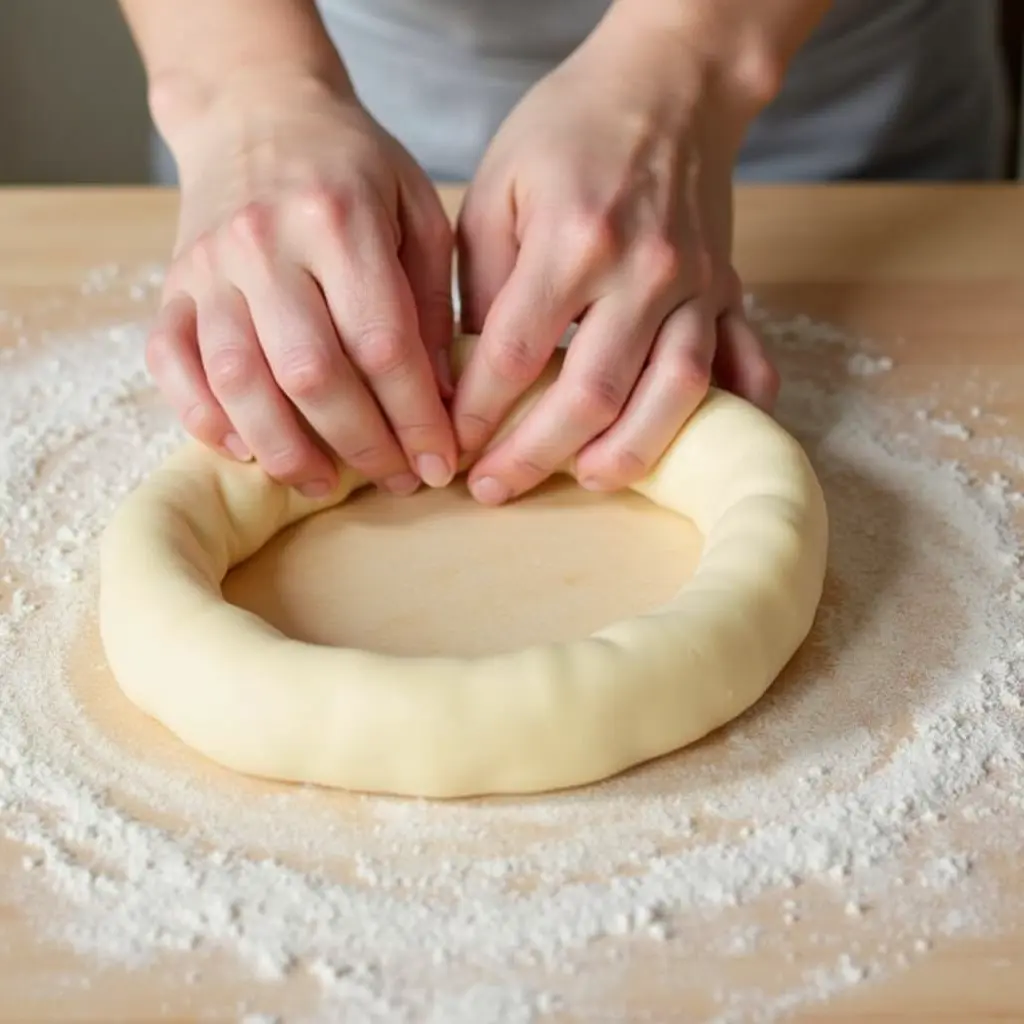
Here’s a quick breakdown of how to shape your bagels like a pro:
- Divide the Dough: Start by dividing your fermented dough into equal portions—about 90–100 grams each works well for standard-sized bagels. Use a bench scraper to make clean cuts and avoid tearing the dough.
- Roll Into Balls: Gently roll each piece into a smooth ball on a lightly floured surface. This step helps create tension in the dough, which is crucial for maintaining structure during boiling and baking.
- Form the Hole: Once you’ve got your balls (see what I did there?), poke a hole through the center with your thumb or index finger. Gradually stretch the opening until it’s about 1½ inches wide. Don’t worry if it feels awkward at first—it gets easier with practice!
Common Mistakes to Avoid
Let me share a little secret: one of my biggest mistakes early on was not creating a big enough hole. Rookie move, I know. What happens is this—the dough shrinks during boiling and baking, leaving you with tiny holes or no hole at all. Trust me; nobody wants a bagel pretzel hybrid unless we’re calling it something fancy like a “pretzel-bagel fusion.”
Another tip? Be gentle when shaping. Overworking the dough can knock out all those lovely air bubbles you worked so hard to develop during fermentation. You’ll end up with dense bagels instead of light, chewy ones.
Tools That Make Shaping Easier
If you’re struggling with hand-shaping, don’t sweat it. There are tools that can help, like ring molds or even cookie cutters. While these aren’t strictly necessary, they do take some of the guesswork out of achieving uniform shapes. Plus, they save your hands from cramping after shaping a dozen bagels!
So, grab your flour, dust off your counter, and give it a shot. Remember, imperfections are part of the charm—and besides, no one will care once they sink their teeth into a freshly baked sourdough bagel. Happy shaping!
Boiling Bagels Before Baking
Why Boiling Is Essential for a Crispy Crust
Here’s the deal: if you skip the boiling step, your bagels won’t be real bagels—they’ll just be sad little rolls pretending to be something they’re not. Boiling is what gives sourdough bagels their signature crispy, golden crust and helps them hold that perfect chewy texture inside. Trust me, I learned this the hard way when I tried rushing through my first batch. Rookie mistake alert!

Boiling does more than just add crunch—it also helps gelatinize the starches on the surface of the dough, creating a barrier that locks in moisture during baking. This process ensures your bagels stay soft and chewy on the inside while developing that irresistible crackle on the outside.
Best Practices for Boiling Water Preparation
For optimal results, simply follow these steps:
- Use Hot—but Not Boiling—Water: Bring a large pot of water to a gentle simmer (around 180°F–200°F). You don’t want it bubbling furiously because that could tear apart your carefully shaped bagels.
- Add Flavor Enhancers: For extra depth, toss in a tablespoon of honey, barley malt syrup, or even baking soda. These additives help deepen the color and enhance the flavor of your bagels. My personal favorite? A mix of honey and a pinch of salt—it adds sweetness without overpowering the sourdough tang.
- Boil Briefly: Drop your shaped bagels into the water one at a time and let them float for about 30–60 seconds per side. Flip halfway through to ensure even cooking. Pro tip: If the bagel sinks initially but rises after a few seconds, it’s proof-positive your dough is ready to go.
Troubleshooting Common Issues
One time, I boiled my bagels for too long, and guess what happened? They turned out dense and gummy instead of light and airy. Lesson learned: timing matters! Another thing to watch out for is overcrowding the pot. Stick to boiling two or three bagels at a time to give them enough space to cook evenly.
So there you have it—the secret to perfectly boiled bagels lies in patience, precision, and maybe a splash of creativity. Once you’ve mastered this step, your bagels will practically beg to be baked—and devoured!
Achieving the Ideal Baking Environment
Preheating Your Oven Correctly
Alright, listen up—this might sound obvious, but preheating your oven properly is crucial for baking sourdough bagels. I’m talking about more than just setting the temperature and walking away. You’ve got to make sure everything in that oven is hot before you slide your bagels in. Why? Because if your oven isn’t fully preheated, your bagels won’t get that initial burst of heat they need to rise and develop a crispy crust.
Here’s what works best: Preheat your oven to 450°F (or 230°C) for at least 30 minutes. And here’s a pro tip—use a pizza stone or baking steel if you’ve got one. These bad boys retain heat beautifully and help create an even bake. Place it on the middle rack while preheating so it gets nice and toasty. Trust me, your bagels will thank you later.
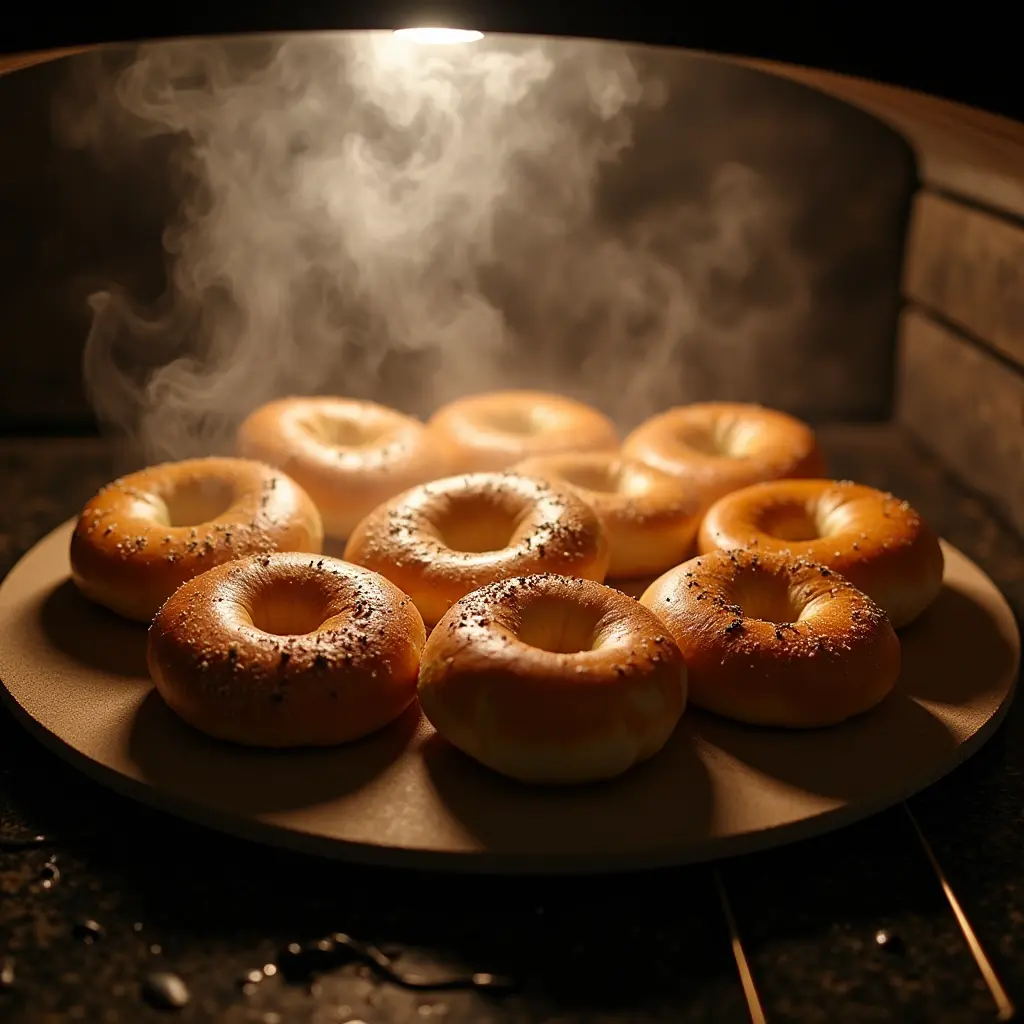
Steam Baking for Maximum Crispiness
Now, here’s where things get fun—steam baking! Ever wonder why professional bakeries crank out bagels with such a perfectly crispy exterior? It’s all about steam. When you introduce moisture into the oven during the first few minutes of baking, it helps the starches on the surface of the bagel gelatinize, giving you that glorious crunch.
There are a couple of ways to add steam:
- Use a Spray Bottle: Mist the walls of the oven lightly with water right after you put the bagels in. Be careful not to spray directly onto the heating elements though—you don’t want any accidents!
- Throw Some Ice Cubes In: Place a metal pan on the bottom rack of your oven and toss in a handful of ice cubes once the bagels go in. As the ice melts, it creates steam. Simple, right?
Let the bagels bake with steam for about 10–12 minutes, then open the oven door slightly to let the moisture escape. This transition from steamy to dry heat ensures your bagels crisp up beautifully without getting soggy.
My Biggest Baking Blunder
One time, I forgot to preheat my oven completely and threw the bagels in early. Big mistake. They barely rose, and the crust was lackluster. Moral of the story? Patience pays off—especially when it comes to baking sourdough bagels. So take the extra time to prepare your oven, add some steam magic, and watch those bagels transform into golden perfection. Happy baking!
Customizing Your Sourdough Bagels Recipe with Toppings
Classic Topping Ideas for Sourdough Bagels
Let’s talk toppings, because let’s be real—what’s a bagel without its crown jewels? While plain sourdough bagels are delicious on their own, adding some toppings can elevate your breakfast game to the next level. Here are some classic options that never fail:
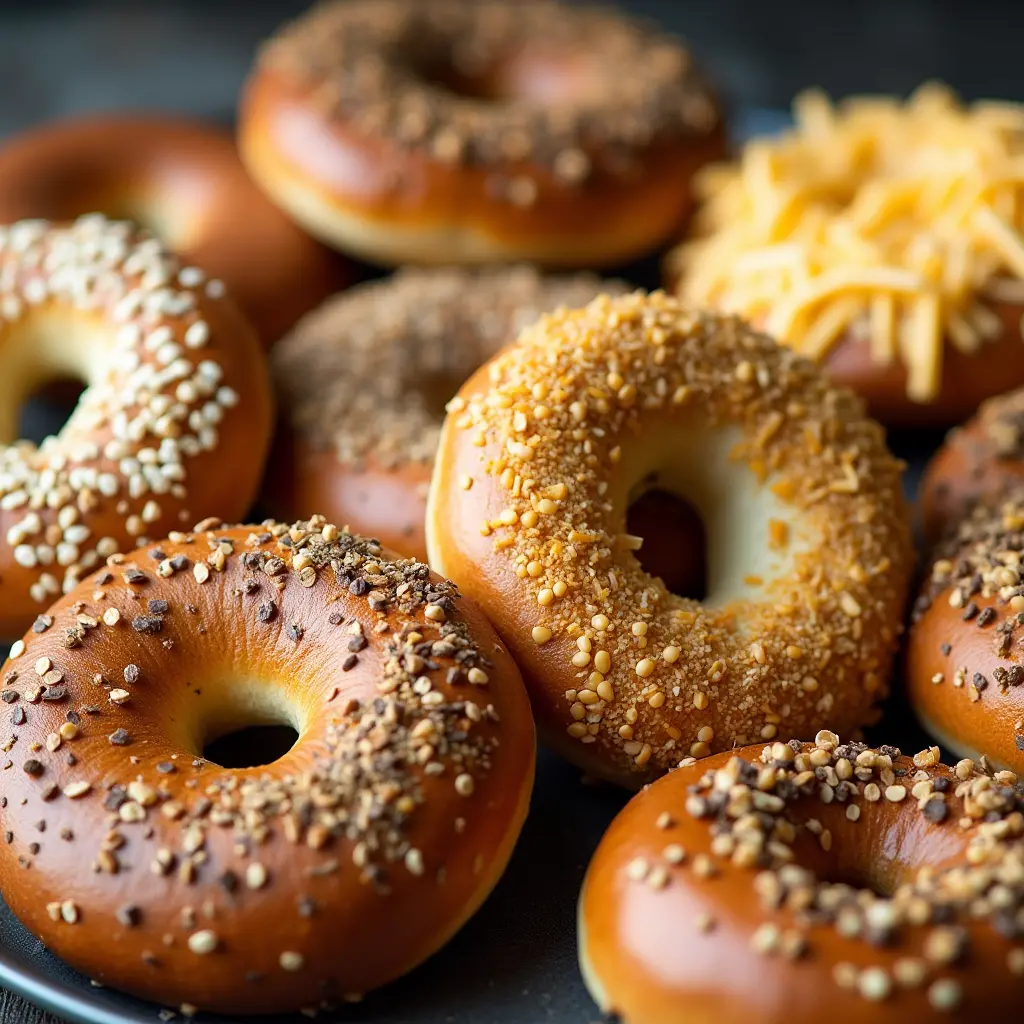
- Sesame Seeds: For a nutty crunch and subtle flavor boost.
- Poppy Seeds: Adds a pop of texture and a slightly earthy taste.
- Everything Seasoning Blend: A mix of sesame seeds, poppy seeds, dried garlic, dried onion, and salt—it’s like magic in a jar.
- Sea Salt Flakes: Coarse sea salt sprinkled generously gives a salty kick that pairs perfectly with cream cheese or smoked salmon.
Creative Flavor Combinations
But why stop at classics when you can get creative? Over the years, I’ve experimented with all sorts of fun variations, and here are a few favorites:
- Cinnamon Raisin: Add cinnamon to the dough and fold in raisins before shaping. Perfect for sweeter cravings!
- Garlic Herb: Mix minced garlic, rosemary, thyme, and parsley into melted butter, then brush it onto boiled bagels before baking. It’s savory heaven.
- Jalapeño Cheddar: Fold shredded cheddar cheese and diced jalapeños into the dough for a spicy twist. Great for brunch lovers!
My Favorite Combo Moment
I remember the first time I made jalapeño cheddar bagels—they were an absolute hit at my family gathering. Everyone was skeptical at first (“What does spice have to do with bagels?”), but one bite changed their minds. The heat from the jalapeños balanced beautifully with the sharpness of the cheddar and the tanginess of the sourdough. Pure genius!
If you’re feeling adventurous, don’t hesitate to try unique combinations. Who knows? You might stumble upon your new signature flavor. Just remember, balance is key. Too much of anything can overpower the delicate flavors of sourdough. So go ahead, experiment, and make those bagels your own!
Conclusion
Baking sourdough bagels at home doesn’t have to be intimidating. By following these five secrets, you can create delicious, restaurant-quality bagels with a crispy golden crust and soft, chewy interior. Remember, practice makes perfect, so don’t hesitate to experiment with different techniques and flavors. Now go ahead and impress your friends and family with your newfound baking skills!
FAQs
1. Can I use instant yeast instead of sourdough starter?
While possible, using instant yeast changes the flavor profile. For authentic sourdough bagels, stick to a natural starter.
2. How long does it take to make sourdough bagels from start to finish?
Expect about 24 hours, including fermentation and proofing time.
3. What type of flour works best for sourdough bagels?
Bread flour or all-purpose flour enriched with gluten gives the best structure and chew.
4. Do I need special equipment to bake sourdough bagels?
A pizza stone or baking steel helps but isn’t mandatory. A regular baking sheet works too.
5. Why are my bagels dense instead of chewy?
Underproofing or insufficient hydration may cause density. Ensure proper fermentation and dough consistency.