

Who doesn’t love warm, gooey cinnamon rolls fresh out of the oven? But what if we told you that using sourdough starter takes these treats to another level? That’s right—sourdough adds depth, tanginess, and an unmatched texture to your classic cinnamon rolls! In this article, I’ll share my go-to sourdough cinnamon rolls recipe , broken down into 7 easy steps so even beginners can master it. Whether you’re serving them up for breakfast or as part of a weekend brunch, these rolls are sure to impress everyone!
Table of Contents
Why Choose a Sourdough Cinnamon Rolls Recipe?
Let me tell you, folks, there’s something magical about baking with sourdough. It’s not just another trend—it’s a game-changer, especially when it comes to cinnamon rolls. You might be wondering, “Why go through the trouble of using sourdough starter instead of regular yeast?” Let me explain it to you.
Health Benefits of Using Sourdough Starter
Sourdough is way easier on your digestion than other types of bread or pastries. Here’s why:
- The natural fermentation process breaks down gluten proteins.
- It pre-digests starches, making it gentler on your tummy.
Years ago, I had a store-bought cinnamon roll that left me feeling bloated. Switching to sourdough was like finding my happy place—no more stomachaches!
Unique Flavor Profile from Fermentation
Now, here’s where things get exciting: the flavor.
- Sourdough gives these rolls a tangy kick that’s absolutely addictive.
- That subtle sourness pairs perfectly with the sweetness of cinnamon and sugar.
When I first tried adding sourdough to my cinnamon rolls, I thought, “Is this what angels eat?” Honestly, though, the depth of flavor is truly unparalleled. Plus, every batch tastes slightly different depending on how active your starter is—kinda like having a little experiment in the kitchen!
How Sourdough Improves Texture
And let’s talk texture because, honestly, who doesn’t love soft, chewy rolls?
- Sourdough adds an airiness to the dough that you just don’t get with instant yeast.
- Those long fermentation times allow the gluten to relax, creating a pillowy soft crumb.
My very first attempt at sourdough cinnamon rolls turned out denser than expected (lesson learned: patience pays off). But once I got the hang of it, they were perfection.
So, whether you’re looking for healthier options, richer flavors, or better textures, sourdough cinnamon rolls are worth the effort. Trust me, after one bite, you’ll never look back!
Ingredients You’ll Need for This Recipe
Alright, let’s talk ingredients! When it comes to making sourdough cinnamon rolls, having the right stuff on hand is key. Don’t worry—I’ve been there, standing in the middle of my kitchen realizing I forgot one crucial thing (cough butter). Let’s make sure that doesn’t happen to you.
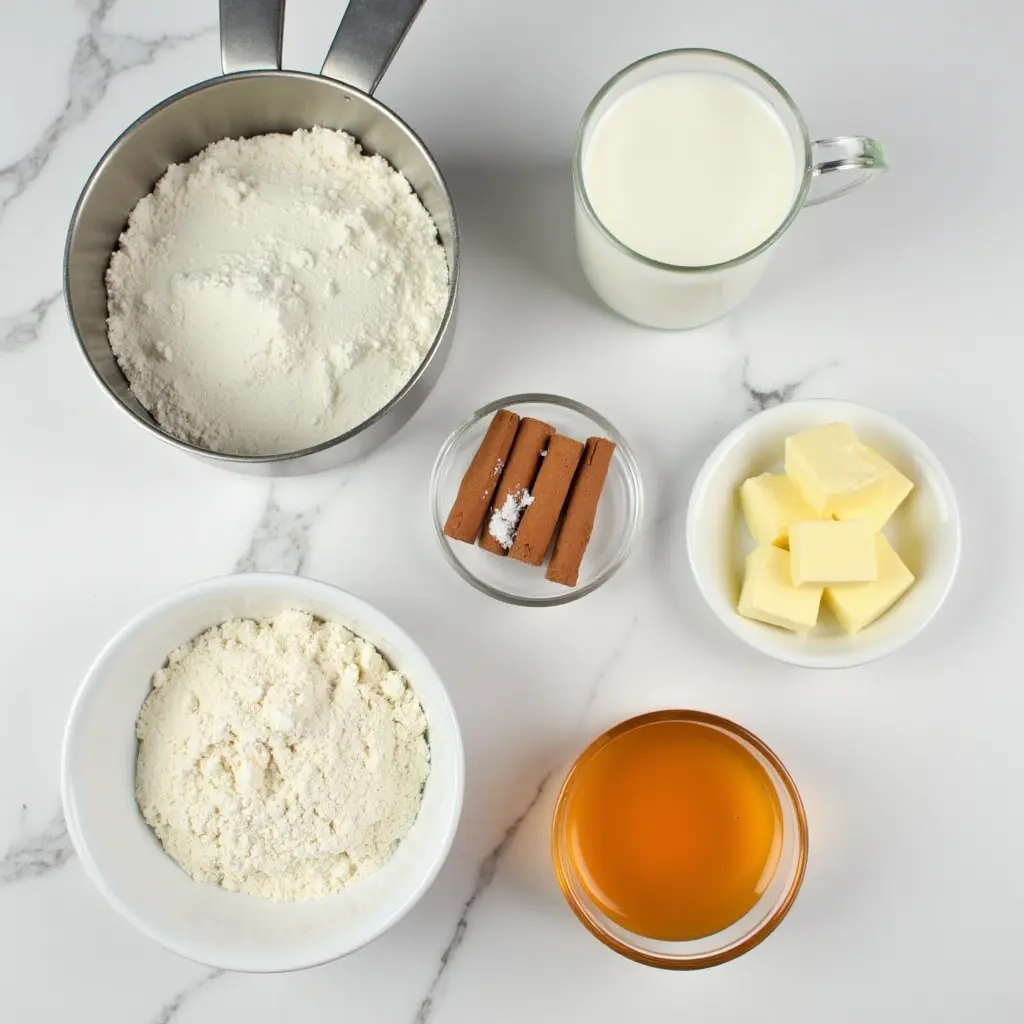
Here’s what you’ll need:
Dry Ingredients Overview
First off, we’re talking flour—lots of it! Use a mix of all-purpose and bread flour for structure. Why? Because bread flour has more protein, which helps with that fluffy texture.
- All-purpose flour: 4 cups (plus additional for dusting)
- Bread flour: 1 cup
- Granulated sugar: ½ cup (for sweetness, obviously!)
- Cinnamon: 2–3 tablespoons (adjust based on how much spice you like)
Pro tip: If you’re not a fan of super-sweet treats, cut back on the sugar by a tablespoon or two. I once made these rolls way too sweet because I didn’t measure properly—lesson learned!
Wet Ingredients List
Now, onto the wet stuff. These babies bring everything together:
- Active sourdough starter: ¾ cup (make sure it’s bubbly and happy!)
- Whole milk: ½ cup (warm, but not hot—microwave cautiously!)
- Eggs: 2 large ones (one for the dough, one for egg wash later)
- Melted butter: ½ cup (because life needs butter, always)
Fun fact: Using warm milk activates the yeast in your starter faster. But if it’s too hot, it’ll kill those precious little microbes. Trust me, I killed mine once—it was sad.
Optional Add-ins Like Nuts or Chocolate Chips
Feel free to get creative here! Some of my favorite extras include:
- Chopped pecans or walnuts for crunch
- Mini chocolate chips for decadence
- A drizzle of honey in the filling for extra gooey goodness
One time, I threw in some shredded coconut just for kicks. It worked surprisingly well! So don’t be afraid to experiment and make these rolls your own.
With this list in hand, you’re ready to roll up your sleeves and dive into some serious baking fun. Up next? Mixing that dough!
Step-by-Step Guide to Making Sourdough Cinnamon Rolls
Alright, buckle up because we’re diving straight into the heart of this sourdough cinnamon roll adventure! This isn’t rocket science, but it does take a bit of patience and care. Here’s how you can whip up these delightful treats in just 7 simple steps.
Step 1 – Activate Your Sourdough Starter
First things first: your sourdough starter needs to be lively and bubbly. If it’s been chilling in the fridge, feed it a day before you plan to bake.
- Mix equal parts flour and water with your starter until it looks frothy.
- Let it sit at room temp for 4–6 hours.
Pro tip: I once used a sluggish starter and ended up with flat rolls—learn from my mistake!
Step 2 – Mix Dough and Let It Rise
Now comes the fun part: mixing the dough! Mix together the flours, sugar, eggs, milk, and melted butter in a large bowl. Add your activated starter last.
- Knead the dough by hand or use a stand mixer (lazy girl move alert: I prefer the latter).
- Place a damp cloth over the bowl and allow it to rise for 4–6 hours.
Don’t rush this step—it’s where the magic happens. While waiting, binge-watch your favorite show; trust me, it’ll pass faster.
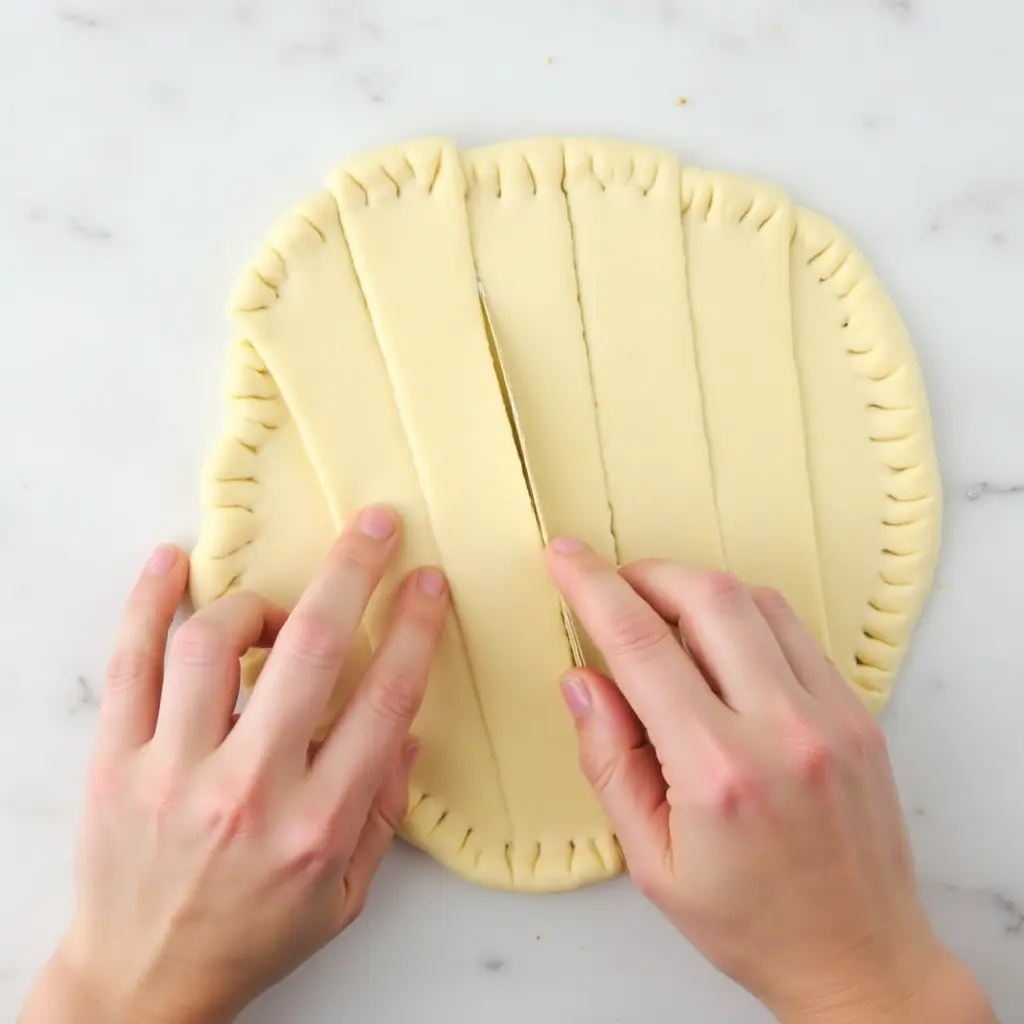
Step 3 – Roll Out the Dough
Once risen, punch down the dough gently and transfer it to a floured surface.
- Roll it out into a rectangle about ¼ inch in thickness.
- Keep it even so your rolls bake uniformly.
If the dough resists rolling, let it rest for 5 minutes—patience is key here.
Step 4 – Spread the Filling Evenly
Here’s where the flavor magic happens. In a small bowl, blend softened butter, brown sugar, and cinnamon.
- Evenly distribute the mixture across the rolled-out dough.
- Leave about ½ inch uncovered on one side for sealing later.
I like to sprinkle chopped pecans or chocolate chips for extra flair. Go wild!
Step 5 – Slice and Arrange Rolls
Roll up the dough tightly from the long edge, then slice it into 1-inch pieces.
- Place them in a greased pan, leaving space between each roll.
- Any scraps? Make mini rolls—they’re adorable!
One time, I got carried away slicing and ended up with teeny-tiny rolls. Still tasty though!
Step 6 – Second Proofing Process
Cover the pan again and let the rolls proof for another 1–2 hours.
- They should double in size.
- If they don’t rise enough, give ‘em more time—it’s worth it.
Patience pays off big time here, folks.
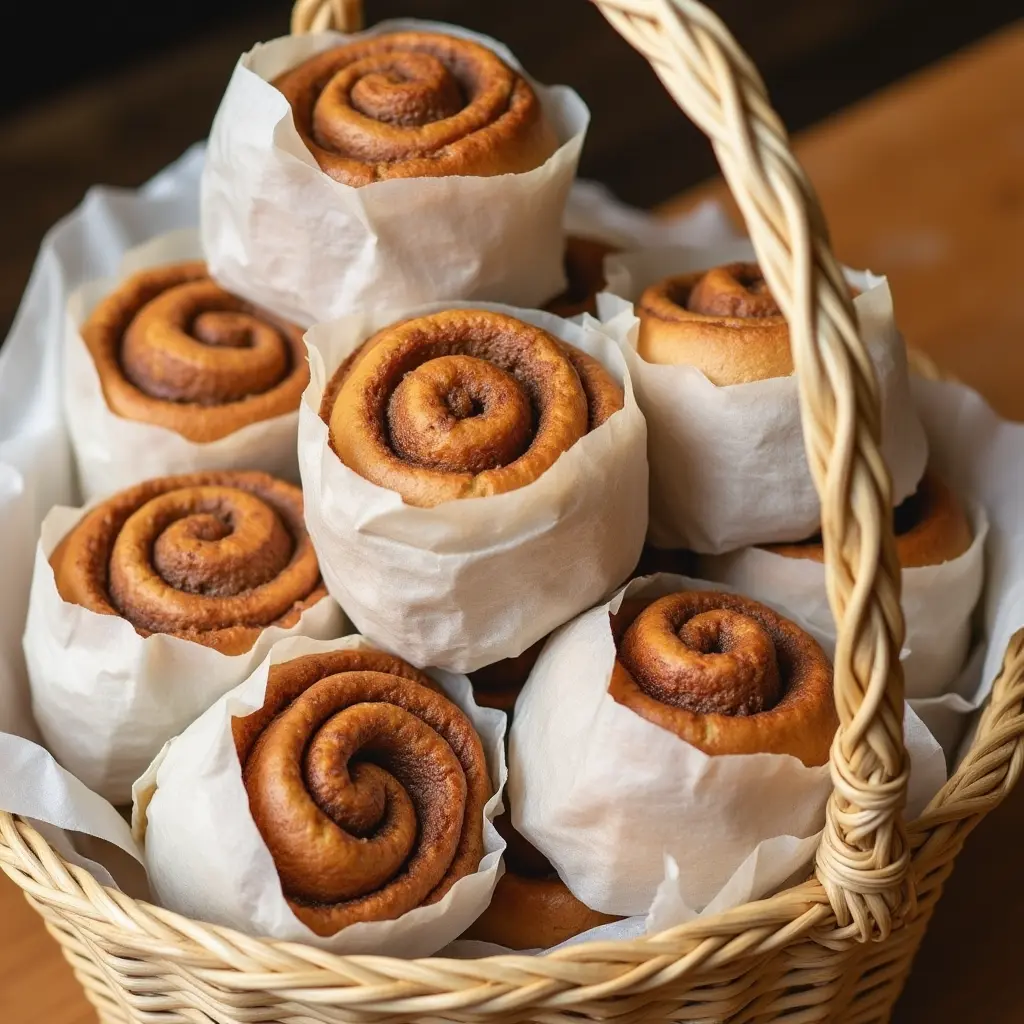
Step 7 – Bake Until Golden Brown
Preheat your oven to 375°F (190°C) and bake the rolls for 20–25 minutes.
- Rotate halfway through for even browning.
- Cool slightly before drizzling with icing.
When that timer goes off, prepare yourself for pure bliss. Freshly baked sourdough cinnamon rolls are irresistible!
And there you have it—a step-by-step guide to baking perfection. Now grab your apron and get to work—you’ve got some serious rolling to do!
Tips for Perfecting Your Sourdough Cinnamon Rolls
Alright, let’s talk about the little tricks and tweaks that can take your sourdough cinnamon rolls from good to amazing . Over the years, I’ve learned a thing or two (and made plenty of mistakes along the way). Here’s what you need to know to nail this recipe every single time.
Common Mistakes to Avoid
Let’s start with the don’ts because knowing what not to do is half the battle.
- Overworking the dough: Sourdough loves a gentle touch. If you knead it too much, the gluten gets tough, and your rolls won’t be as soft.
- Rushing fermentation: Give your dough the time it needs to rise properly. I once tried speeding things up by cranking up the heat, and guess what? Flat, dense rolls. Not ideal.
- Using cold ingredients: Warm milk and room-temperature butter are key. Cold stuff slows down fermentation, which means longer waiting times—and who has time for that?
Tricks for Achieving Fluffy Rolls
Now, here’s how to make those rolls light and airy:
- Feed your starter well: A happy, bubbly starter equals better flavor and texture. Think of it like fuel for your dough.
- Use bread flour sparingly: Bread flour adds structure, but too much can make the rolls dense. Follow the recommended ratio provided in the recipe.
- Don’t skip the second proof: That extra rise after shaping makes all the difference. It might seem redundant, but trust me—it’s worth it.
Storing and Reheating Leftovers
Because yes, there will probably be leftovers—and they’ll still taste amazing!
- Store them right: Let the rolls cool completely, then wrap them tightly in plastic wrap or aluminum foil. They’ll stay fresh for a couple of days at room temperature. For extended storage, store them in the freezer.
- Reheat wisely: To reheat, toss them in the oven at 350°F (175°C) for 5–7 minutes. Microwaving works in a pinch, but it can make the rolls a bit soggy if you overdo it.
One final tip: Don’t stress if something goes wrong. Baking with sourdough is part science, part art, and 100% trial and error. Even my worst batches were edible—and honestly, they tasted pretty darn good with a dollop of whipped cream. So relax, enjoy the process, and remember: practice makes perfect!
With these tips in your back pocket, you’re ready to conquer the world of sourdough cinnamon rolls. Happy baking!
Variations to Customize Your Recipe
Alright, let’s get creative! One of the best things about sourdough cinnamon rolls is their versatility. Once you’ve mastered the basic recipe, it’s time to put your own spin on things. Here are some fun ideas to mix it up and keep things interesting.
Gluten-Free Sourdough Option
If you or someone in your family has gluten sensitivities, don’t worry—you can still enjoy these delicious treats!
- Use a gluten-free flour blend: Look for one specifically designed for baking bread. Some blends even include xanthan gum, which helps with structure.
- Adjust hydration levels: Gluten-free flours absorb more liquid, so you might need to add extra milk or water to achieve the right consistency.
I tried this once for a friend, and honestly? The texture was spot-on. Just be prepared for a slightly different flavor profile since gluten-free flours tend to taste milder.
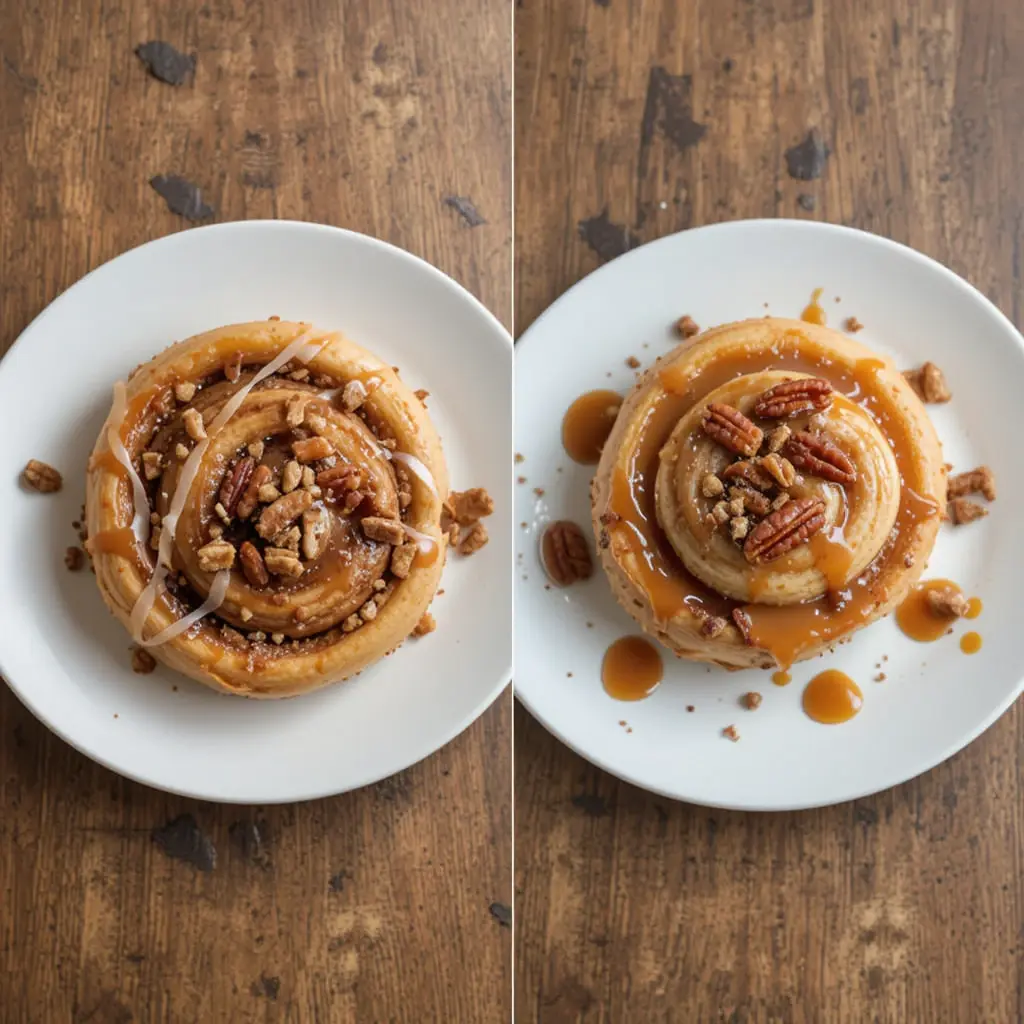
Adding Extra Toppings Like Streusel or Pecans
Who says cinnamon rolls have to stick to just cinnamon? Spice things up with some extra toppings:
- Streusel topping: Mix brown sugar, flour, cinnamon, and cold butter until crumbly. Sprinkle it over the unbaked rolls before they go in the oven.
- Chopped pecans or walnuts: Add a crunchy element by sprinkling nuts over the filling before rolling. They pair perfectly with the soft dough.
Pro tip: If you’re feeling fancy, drizzle melted chocolate over the top after baking. Life hack: no one will judge you if you eat it straight from the pan.
Experimenting with Different Sugars or Spices
Why limit yourself to plain old white sugar and cinnamon? Branch out and try something new:
- Brown sugar vs. white sugar: Brown sugar adds moisture and a deeper molasses flavor. It’s my personal fave for cinnamon rolls.
- Spice swaps: Swap out regular cinnamon for ground nutmeg, cardamom, or ginger. Or go bold with a pinch of cayenne pepper for a spicy kick.
Once, I made a batch with maple syrup instead of sugar in the filling. Let me tell you—it was pure heaven. But hey, sometimes simplicity reigns supreme too.
The beauty of sourdough cinnamon rolls lies in their adaptability. Whether you’re catering to dietary needs, trying out exotic flavors, or simply wanting to impress guests, there’s always room to experiment. So grab your ingredients, roll up your sleeves, and let your creativity shine!
Now, who’s ready to take their cinnamon rolls to the next level? 🍓✨
Conclusion
There you have it—the best sourdough cinnamon rolls recipe made simple! By following these 7 steps, you’ll create irresistible treats that combine the rich flavors of cinnamon and the unique tang of sourdough. So gather your ingredients, activate your starter, and get ready to enjoy some seriously delicious homemade goodness. Don’t forget to experiment with variations to make these rolls uniquely yours. Happy baking!
FAQs
1. How long does the dough need to rise?
Typically, the first rise takes about 4–6 hours depending on room temperature. The second proofing lasts around 1–2 hours.
2. What type of flour works best for sourdough cinnamon rolls?
All-purpose flour is ideal, but bread flour provides extra structure. Using a combination of both works beautifully as well.
3. Can I freeze sourdough cinnamon rolls?
Absolutely! Freeze unbaked rolls after shaping and thaw overnight before baking. Alternatively, freeze leftovers and reheat in the microwave or oven.
3. Why are my cinnamon rolls dense instead of fluffy?
Overmixing the dough or insufficient rising time may cause denseness. Ensure proper fermentation and gentle handling during shaping.